Liphaphatha filled with beans
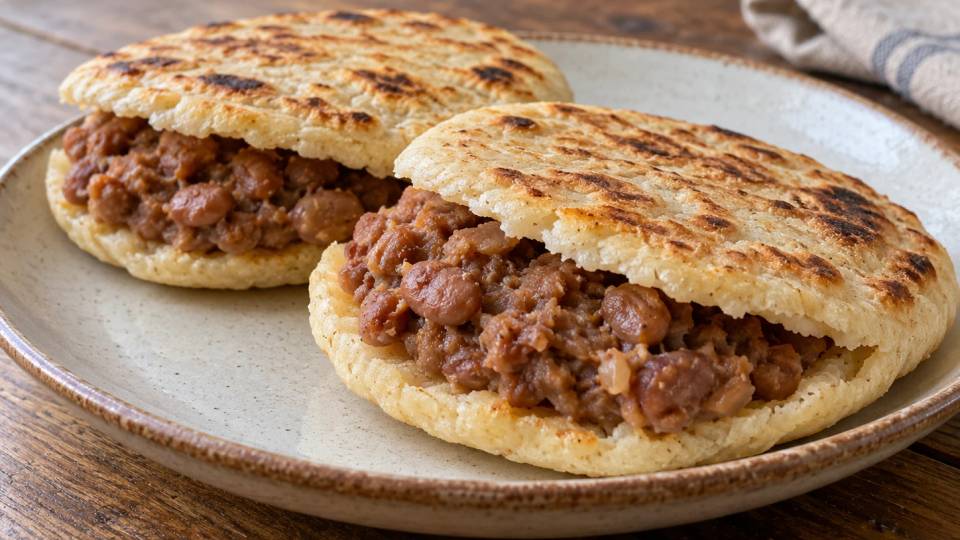
Liphaphatha filled with beans for four people, with measured quantities and step-by-step preparation. A contemporary editorial pairing of liphaphatha and beans.
Ingredients
- 400 g wheat flour
- 240 ml lukewarm water
- 5 g dried baker’s yeast
- 5 g sugar
- 4 g salt for the dough
- 400 g canned brown beans, drained and rinsed
- 1 onion
- 15 ml oil
- 100 ml water for the filling
- 1 g salt for the filling
- Black pepper
Preparation
Mix flour, yeast, sugar and 4 g salt. Add 240 ml lukewarm water and knead for 8 minutes. Cover and rise for 1 hour until visibly expanded; allow for this rest.
During the rise, slice the onion and soften in oil for 7 minutes. Add beans, 100 ml water, 1 g salt and pepper.
Simmer for 10 minutes and roughly mash some beans. Keep the filling hot and thick enough to stay inside bread.
Divide dough into 8 portions and flatten into 1.5 cm discs. Cover and rest for 15 minutes; allow for this second rest too.
Heat a heavy pan over medium-low heat. Cook in batches for 7–8 minutes per side, lowering heat if browning too quickly. Check that the centre is cooked.
Split the slightly cooled breads with a knife and fill. Serve two small breads per person with salad.
Introduction
A contemporary editorial pairing of liphaphatha and beans. The breads belong to a documented family, but this exact filling is not an established independent tradition.
Do not make the filling watery; mashing a few beans thickens the juices. The method below gives texture and cooking cues so the preparation can be adapted to the available ingredients and equipment. The proportions are those of a domestic version written for this collection; they have not been tested in a kitchen.
The result to look for
Eight pan-cooked yeast breads receive a thick cooked-bean filling. Keep dough and filling water separate and allow both rises before cooking, then open warm breads to fill.
Reading the dough and planning rises
Judge dough by touch as well as time. Flour absorbs water gradually, and two similarly named flours can feel slightly different. Start with the stated proportions and mix until dry patches disappear before deciding something is missing. Young dough can look uneven without being unsuccessful. Kneading and resting then change its structure. Avoid rapidly adding lots of flour to remove every trace of stickiness: this may make the bread needlessly dense and change the intended balance.
Cover dough during rising to limit drying and choose somewhere without excessive heat. Lukewarm water must not be scalding. The stated time depends on room conditions; observe expansion and appearance instead of seeking a universal minute. After dividing or shaping, handle without unnecessarily tearing the surface. Equal-sized portions cook more evenly. If several batches are needed, protect waiting dough pieces and set out equipment before starting the first batch.
Respect this recipe’s specific method: a pan, an oven and a closed vessel produce different surfaces. Fast exterior browning does not guarantee a cooked centre. Adjust heat to let the crumb form without burning the crust or faces. When a very hot pot is required, check that the lid, handles and baking paper are suitable. Resting or cooling after cooking helps set the crumb; slicing too soon can give the impression of sticky dough. Filled breads need a cohesive filling that stays in place rather than immediately wetting the crumb. Accompaniments and composite flours are variations to describe precisely, not grounds for treating every change as a new independent traditional bread.
Tips
Do not make the filling watery; mashing a few beans thickens the juices.
Planning
Active preparation: 30 min. Indicative cooking: 30 min. Also allow for a 1-hour rise followed by a 15-minute rise. The total time includes these planned periods; extend cooking if the tenderness cues have not been reached.
Serving
Serve as directed in the final step; suggested accompaniments are not included in the quantities unless explicitly stated.
Storage
Use clean utensils. Cool leftovers without leaving them at room temperature for long, then refrigerate in a closed container. Reheat only the portion needed.